|
Advanced:
Creating an Image Map
If you
have ever wanted to create a page on which the hyper links
to other pages did not look like a typical HTML hyper link...
blue text, underlined, kind of boring... and instead wanted
to use something more elaborate such as an image which carries
the theme of your web site into the navigational pieces,
then the options left could include a form button, or an
image. Form
buttons can be nice but they are limited to rectangular
shapes and don't easily lend themselves to elaborate interfaces,
which leaves us with images as the most likely tool to be
used for our purposes. Images can be adapted to even the
most elaborate of interfaces but they suffer from at least
two Internet maladies.
The
first problem is that images take far longer to download
from a web server than the ASCII code that makes up an HTML
page. In fact often a single image on a web page is larger
than then entire web page itself. Let's suppose we had ten
pages that we wanted to link to from a navigational piece
then we could easily have to create ten images, which means
our visitors will make at least ten trips to the server
to get the web page and this can be bad for business since
many visitors use slower dial up connections. So, having
to create different graphics for each link is not the answer,
instead we need to create as few graphics as possible and
make them as small as feasible. This brings up the second
problem, if we are using a graphic image as the hyper link
then a user click anywhere on the graphic will bring the
user to the same place, so we need a way to make different
areas of the graphic link to different places... voila,
enter image maps.
The
solution to the problem then is to create an image map using
the link image. By doing this we can create those ten or
so "buttons" on one graphic and then define
the areas on the image that will respond to a visitor's
mouse clicks. Image maps come in two flavors, one is a server-side
map, and the other is a client-side map. The primary difference
between these two types is that one keeps the information
that defines the clickable areas on the server in a separate
file, and the other keeps it within the web page that is
downloaded to the visitor otherwise known as the "client".
We will focus on client-side image maps because they are
often easier to implement and they allow the user's machine
to do the processing which can be faster, and they don't
bog down the web server unnecessarily. (As a note, server-side
image maps were originally used because early web browsers
didn't have a mechanism to support client-side maps, but
all current browsers which honor the W3C HTML standards
support client-side image maps, so the need for a server-side
map is no longer as relevant as it once was.)
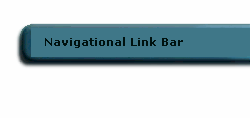
We will
create an example in which we will create an image of a
navigation bar which has a number of "buttonish"
parts that can be clicked to visit different pages. The
steps necessary are as follows. First, create the image,
then define the clickable regions, then create the HTML
needed to respond to the clicks, and last, upload the image
and the HTML for the map to your web space.
Table
of Contents
Create
an image for the map
Define
the clickable regions of the map
Create
the HTML for the map
Upload
the Image and the HTML for the map
View
the working example
Create
an image for the map
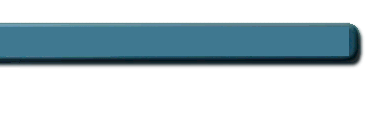
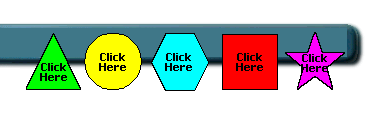
In our
example we will use a "bar" as the basis of the
navigation bar and then use a variety of shapes as the "buttonish"
clickable regions. Here are the initial pieces of the bar
which were created using Paint
Shop Pro. Any graphics program can be used provided
it can save graphics in a format usable on the world wide
web. (For example, .GIF, .JPG, or .PNG to name a few formats.)
Keep in mind while each of these pieces is separate ultimately
we want to combine the pieces into a single image, however
when creating images by keeping separate pieces it makes
changing things around much easier if we should ever decide
to edit the image map later.
The
left and right pieces of the bar itself will be kept separate
because it could be integrated into a different interface
for example. In our creation it will stand apart from the
surrounding interface pieces. The individual shapes will
act as the clickable regions and so they will be combined
into the right hand piece of the bar. Here is the example
with the right hand bar combined into a single graphic.
(With the text "Click Here" added for this example.)
Define
the clickable regions of the map
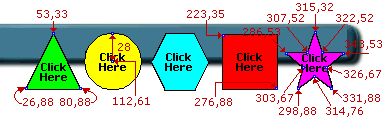
Using
the paint program we must plot the vertices of each clickable
area. Begin first by determining the type of shape we are
working with. The image map mechanism gives us three shape
variations that can be used to describe the clickable regions
on our image, so we need to fit each region into the most
logical one of the shape types. The three shape types are:
"Rect"
(rectangle) which is defined as a four sided shape each
corner with a right angle. In order to plot a rectangle
we need two sets of x and y coordinates. Examining the shapes
to see if any fit this definition we can see that the red
square does.
"Circle"
which requires an x and y coordinate for the center point
and the radius (the distance from the center to the outer
edge.) One of the shapes in our example is a circle so we
will need to know it's center x and y coordinates and the
distance in pixels from x or y out to the edge of the circle.
"Polygon"
which is defined as a closed shape with three or more sets
of x and y vertices. Our example has three polygons, specifically
the triangle, the hexagon, and star shape. If the fact that
a polygon is an undefined number of vertices makes it seem
confusing don't let it be, it simply means that if we pick
a corner to start with, determine the x and y coordinates
of that corner and then move to the next corner, and so
on, eventually we will return to the corner that we started
from. Also, if we draw straight lines from one point to
the next in the same way we progressed around the shape
we will end up having drawn the shape.
Here
is the clickable part of the navigation bar marked up with
most of the x and y coordinates that we need. (The hexagon
was not marked up because the process for defining it is
exactly the same as the triangle and the star, simply find
each corner's x and y coordinate.) If you want to experiment
then right click on the image and save it to your computer,
then open that image in your paint program and check the
x and y values using the paint brush or a pointer in the
paint program as you move over a corner and see if you get
the same values that we did.
|
Starting
from the left side of the image we first encounter a triangle.
We need to know the x and y values for each of the three
corners. Next comes a circle, for it we find the center
x and y value and the radius (distance from the center to
the outer edge in pixels.) The next shape is a hexagon which
is not marked up in this example but the process is the
same as it was for the triangle and the star. The next shape
is a square which requires only two sets of x and y coordinates,
one for the top, left corner, and another for the bottom,
right corner. Last is the star which is easily the most
complicated example on this page. Counting the corners we
can see that it is made up of ten sets of x and y coordinates.
The reason the star is marked up is to show that even if
we wanted to use a complicated shape it is still not that
difficult to create a clickable region out of the shape.
Create
the HTML for the map
Once
we have mapped each of the shapes that will be used as clickable
regions we are ready to create the HTML which will bring
the work to life. First a name for the map must be chosen,
in our example we will call the map "menu". Then
the image must be placed in the page at the place where
we want it to appear. This is accomplished using the <IMG>
tag as it would be with any normal image. In order to connect
that image to the image map we include USEMAP="#menu"
in the <IMG> tag. Notice the pound sign that has been
included to the left of the map name, this indicates that
the map named "menu" is defined within the current
HTML page (hence "client-side". Also notice that
we have identified that the image is to have BORDER=0 (no
border) this is necessary to prevent the link mechanism
from forcing a border around our image. Finally we need
to include the map definition. This is accomplished with
two tags, first <MAP> which indicates that the following
will be regions on that map, and then the individual regions
using the <AREA> tag. Here is the code to make our
example work. Notice that the <MAP> tag must be closed
with a </MAP> tag to indicate the end of the definition..
<IMG SRC="c:\imagemap.gif" USEMAP="#menu" BORDER=0>


<MAP NAME="menu">
<AREA SHAPE="polygon" COORDS="53,33,80,88,26,88" HREF="#">
<AREA SHAPE="circle" COORDS="113,61,28" HREF="#">
<AREA SHAPE="polygon" COORDS="166,34,193,34,208,62,194,89,165,89,152,61" HREF="#">
<AREA SHAPE="rect" COORDS="223,35,277,88" HREF="#">
<AREA SHAPE="polygon" HREF="#"
  COORDS="315,34,322,52,343,53,326,67,331,88,314,76,298,88,303,67,286,53,307,52">
</MAP>
Upload
the Image and the HTML for the map
One
of the great things about a client-side map is that it can
be easily tested before making it live on the Internet.
When the page is opened from the hard drive using our favorite
browser it should work even without being connected to the
Internet (keeping in mind that any images or hyper links
which are on the Internet may not work correctly until we
are connected, but the map definition should.) Once you
are satisfied that everything is ready simply upload the
image and the HTML to your web space and you are ready to
go. Here is the completed, working example. Enjoy!
Back
to Build Your Site
Back
to Table of Contents
|